
Water Damage Professionals in Duluth: How They Prevent Secondary Damage (Warping, Mold, and Odors)
Every water incident has two stages: the water incident itself and what happens after, when materials stay wet. Water damage professionals call the second stage secondary damage, and it is the reason mold can show up in homes where the leak was fixed weeks ago.
Removing the water is the easy part. The real challenge is making sure every wet material reaches a dry, stable condition before mold, warping, or odor takes hold. That’s why water damage professionals in Duluth spend so much time making sure hidden moisture is removed.
| What you will learn The difference between primary and secondary damage.The eight steps professionals use to prevent secondary damage.What each piece of drying equipment does.How a crew proves your home is dry, using a dry standard and daily readings.How Duluth weather affects drying.Questions to ask before you hire. |
The Difference Between Primary and Secondary Damage
Primary damage is the harm the water does on contact. Soaked carpet. Stained drywall. A flooded basement floor.
Secondary damage is the harm that spreads or develops afterward because materials stay wet.
The ANSI/IICRC S500 is an industry standard that outlines the procedures for professional water damage restoration and tells restorers to identify both primary and secondary damage concerns at the start of every job. Trade guidance describes the main risks. When drying is too slow, water spreads into unaffected materials. Conditions also become favorable for microbial growth. Wood can warp or swell.
| Secondary damage | What happens | Common materials | How pros prevent it |
| Warping and cupping | Wood absorbs water unevenly and changes shape. | Hardwood floors, cabinets, trim. | Control the drying rate. Use floor drying mats. Monitor daily. |
| Swelling and delamination | Layered or engineered materials swell and separate. | Laminate, particleboard, MDF cabinets. | Extract fast. Move air. Remove damaged parts when needed. |
| Drywall breakdown | Gypsum softens. Paper facing can feed mold. | Walls and ceilings. | Dry quickly, or remove and dispose if too wet. |
| Mold growth | Spores germinate on damp organic material. | Drywall paper, pad, wood, insulation. | Speed. Remove unsalvageable porous materials. Dehumidify. Contain if growth exists. |
| Odors | Microbial growth and trapped moisture create smells. | Carpet, pad, upholstery, wall cavities. | Remove source materials. Clean. Deodorize. |
| Corrosion | Moisture rusts metal and can damage electrical parts. | Fasteners, appliances, wiring. | Dry the air and structure quickly. |
| Moisture migration | Water spreads into dry areas. | Adjacent rooms, framing, subfloor. | Map moisture. Dry the whole affected zone, not just the visible part. |
The Eight Steps Pros Follow
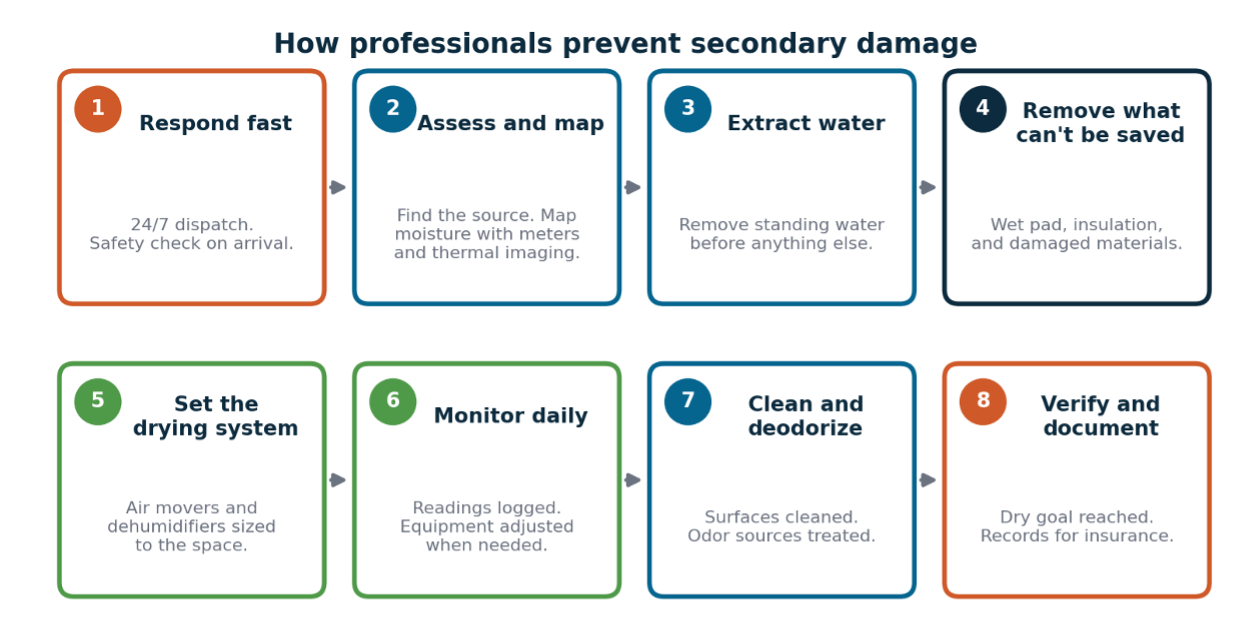
Figure 1. The professional process, from first response to final verification.
Step 1: Respond fast and check safety
Acting quickly gives professionals the best chance of preventing further damage. The sooner drying starts, the better the chance of saving water-damaged materials and preventing mold growth. Ideally, wet materials should be dried within 24 to 48 hours.
On arrival, the crew checks for electrical hazards, structural concerns, and signs of contaminated water.
Dryco operates 24/7. In Duluth and the immediate Twin Ports area, we aim to be on site within 60 minutes.
Step 2: Assess and map the moisture
The crew will identify where the water came from and check whether the leak or other source has stopped. If repairs are necessary, the homeowner may need a plumber, roofer, or another qualified contractor.
With the source identified, water damage pros can now map the damage using moisture meters (to check how wet your building materials are) and thermal imaging cameras (to help spot temperature differences that might indicate hidden moisture). They also take temperature and humidity readings inside and outside.
These tools work together to help the crew determine which areas need more testing.
The S500 standard calls for establishing dry standards and drying goals based on unaffected materials at the start. That sets a clear finish line.
Step 3: Extract the water
Standing water goes first. Using professional extraction equipment is far more effective than household tools.
Step 4: Remove what cannot be saved
Some materials cannot dry fast enough and will need to be removed. The main culprits are usually soaked carpet padding, wet insulation, and damaged ceiling tiles.
Step 5: Set the drying system
This is where most of the secondary damage prevention happens. Air movers, dehumidifiers, and specialty tools are placed based on the size of the space and how wet the materials are. The table in the next section explains each one.
Step 6: Monitor daily and adjust
A drying job is not a set-it-and-forget-it task. Industry guidance says moisture readings should be taken daily, preferably at the same time and in the same locations. If readings stall, then the plan needs to change.
The crew may move equipment, change the setup, or add more equipment based on your home’s needs. If moisture is trapped inside a wall, the crew may need to make a small opening to help it dry. This will depend on the material inside the wall and how much moisture is present. Most crews will do their best to keep these openings small to ensure only the necessary materials are removed.
It’s not reconstruction, which Dryco doesn’t provide. Instead, we document what was removed and the scope of work so your licensed contractor can replace materials afterward.
Step 7: Clean and deodorize
Surfaces that stay are cleaned. If the water was contaminated, antimicrobial products may be used as part of the process. Odor sources are removed and the space is deodorized.
Lingering odors are usually a sign of trapped moisture, contamination, or mold. The source of the odor needs to be addressed before the crew can clean the affected materials as needed and dry the materials thoroughly.
Step 8: Verify and document
The job only ends once your materials reach their drying goals or the crew has identified what materials need to be removed or replaced.
The crew records final readings and keeps the full log. This documentation can support your insurance claim and show whether the affected materials have met their drying goals.
What the Equipment Does
| Equipment | What it does | Why it prevents secondary damage |
| Extraction units | Remove standing water from floors and carpet. | Remove the bulk of the water before it soaks deeper. |
| Air movers | Push air across wet surfaces. | Speed evaporation from materials. |
| Dehumidifiers | Pull moisture out of the air as water evaporates. | Help wet materials continue drying instead of leaving the room damp. |
| Floor drying mats and panels | Pull moisture from beneath hardwood and other flooring. | Limit cupping and buckling. |
| Wall cavity drying systems | Direct air to spaces inside your walls to help dry trapped moisture. Some materials may need to be removed in the process. | Dry hidden moisture without removing finished walls. |
| Moisture meters | Measure moisture content in materials. | Show whether drying is working. |
| Thermal imaging cameras | Show temperature differences on surfaces. | Help find hidden wet areas. |
| Hygrometers and thermometers | Measure humidity and temperature. | Show whether the room conditions allow materials to dry. |
| Air scrubbers | Filter airborne particles. | Help manage airborne dust, mold spores, or other contaminants. |
For more on equipment, read What It Takes to Restore Water Damage Properly.
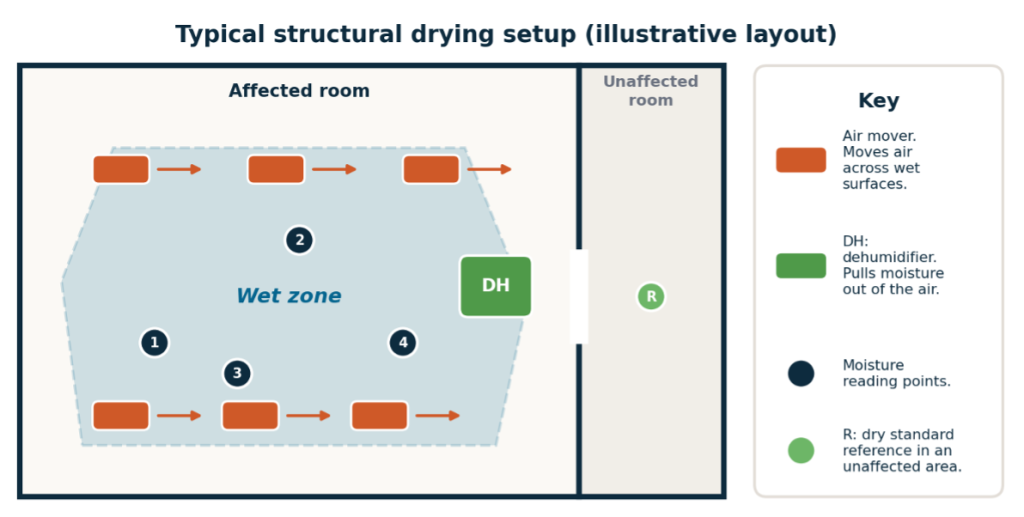
Figure 2. An illustrative drying setup. Real layouts depend on the room, the materials, and the moisture map.
How Pros Prove a Home Is Dry
Every material has a normal moisture level. Professionals call that the dry standard. The S500 defines it as a reasonable estimate of a material’s moisture content before the water event. The dry standard helps the crew set a target moisture level for the affected materials.
To find the dry standard, a technician reads an unaffected area of the same material in the same building. Then they dry the wet area until it matches. This avoids guessing.
Daily readings help track your home’s drying progress. According to industry guidance, the information should be assessed each day, and the set drying goal must be verified once the project is complete.
A good drying log ties readings to material, room, and equipment.
| A good drying log shows | Why it matters |
| Date and time of each reading | Proves daily monitoring. |
| Room and material for each reading | Shows exactly what was dried. |
| Readings compared with the dry standard | Shows progress toward the goal. |
| Temperature and humidity inside and out | Shows whether conditions support drying. |
| Equipment placed, moved, or removed | Shows the plan was adjusted when needed. |
| Final readings that meet the goal | Proves the job is done. |
How Duluth Conditions Change the Job
Local weather and housing shape how drying works here.
- Cold weather can slow drying. In winter, crews need to manage indoor temperature and humidity carefully. Heating and dehumidifying the affected space can help remove moisture, even when outdoor temperatures are low.
- Winter air can help or hinder drying. Cold outdoor air contains less moisture than warm air, but indoor conditions change when that air is heated. Crews need to monitor indoor humidity and use dehumidifiers to remove excess moisture.
- Older homes have layers. Remodeling over decades means more places for water to hide. Subfloors, old sheathing, and plaster behind newer drywall can all hold moisture.
- Basements and crawlspaces are common. They are damp, poorly ventilated, and slow to dry.
- Frozen pipes and ice dams can cause water damage in winter that often affects wall cavities and ceilings.
What Dryco Does and Does Not Do
| Dryco does | Dryco does not |
| Respond 24/7 to water damage. | Do reconstruction or rebuilding. |
| Extract water and dry structures. | Replace drywall, flooring, or cabinets. |
| Remove materials that cannot be dried. | Act as your general contractor. |
| Monitor daily and document with moisture readings. | |
| Remediate mold when it is present. | |
| Work directly with insurance adjusters. |
After drying, we’ll hand you clear documentation. You can then hire a licensed contractor for repairs.
Learn more about why homeowners choose Dryco, our water damage service in Duluth, and our mold remediation service.
Frequently Asked Questions
Q: What is the difference between mitigation and restoration?
Mitigation limits further damage. That means stopping the source, extracting water, and drying. Restoration returns the property to its pre-loss condition, which can include repairs and rebuilding. Dryco handles mitigation and mold remediation. Repairs are done by a licensed contractor.
Q: How long will drying take?
It depends on the materials, the amount of water, and the conditions. Many clean-water jobs take several days. Complex losses take longer. A good crew decides by readings, not by the calendar.
Q: Why are there so many fans and machines in my house?
Air movers and dehumidifiers work together. Air movers lift moisture from surfaces. Dehumidifiers remove it from the air. The crew chooses equipment for the size of the affected area and adjusts it as the materials dry.
Q: Why did they cut into my wall?
Sometimes a wall cavity is too wet to dry through the surface. A small, controlled opening lets air reach the cavity. It is often the fastest way to dry the wet material and try to prevent mold behind the wall.
Q: Can I turn the equipment off at night?
Ask your crew first. Stopping early can leave materials damp inside. If noise is a concern, they may adjust the setup.
Q: Will drying remove odor?
Often, yes, when the odor comes from moisture. If materials were contaminated or mold has grown, cleaning, removal, and deodorizing are also needed.
Resources
Dryco:
What It Takes to Restore Water Damage Properly
Water Damage Restoration: The Complete Homeowner Guide
Water Damage Restoration in Duluth
Agent and Adjuster Information
External:
IICRC: Standards for Water Damage and Mold Remediation
Restoration Industry Association: Top Tips for Moisture Meter Use in Water Mitigation
Restoration and Remediation Magazine: Taking Control of the Structural Drying Process